How to Write a Copyright Footer
If you’ve ever scrolled to the bottom of a website and seen a tiny line that reads “© 2025. SE Rank Pro. All rights reserved.” — congratulations, you’ve met the copyright footer. It may be small, but it carries big weight when it comes to protecting your website content and giving your brand a polished, professional appearance. Still wondering how to write a copyright footer the right way? You’re in the right place. Whether you run a blog, business site, or digital portfolio, this guide will walk you through everything you need—no legal jargon required. Why a Copyright Footer Matters Let’s get something straight: the moment you create original content—whether it’s blog posts, product descriptions, custom graphics, or website code—it’s automatically protected under copyright law. But simply having legal protection isn’t always enough. A copyright footer is your digital megaphone, quietly shouting, “This content is mine. Don’t touch.” While not legally required in most countries, it’s strongly recommended because it: The Key Ingredients of a Copyright Footer To master how to write a copyright footer, you only need a few core ingredients: 1. The Symbol You can use either: The symbol is shorter, cleaner, and more modern, which is why most sites go with it. 2. The Year (or Range of Years) You should include: Examples: This shows that your content has been consistently maintained and protected over the years. 3. The Owner’s Name This should be your name or your business name. In your case: ✅ SE Rank Pro Please don’t forget this step. Writing “© 2025. All rights reserved.” and forgetting to include your name is like locking your door but leaving your house number blank. 4. The Rights Statement The classic “All rights reserved” is still the go-to. It tells people they can’t reuse, republish, or remix your content without permission. Optional variations include: But for most business websites, this works perfectly: ✅ © 2025. SE Rank Pro. All rights reserved. Where Should the Copyright Footer Appear? Put it where your users expect to find it: in the footer of every page on your site. This ensures: Pair it with links to: Automate the Year (Because You’ll Forget) If you’re like most people, you’ll forget to update the copyright year every January. Good news: you can automate it! WordPress (PHP): © <?php echo date(“Y”); ?>. SE Rank Pro. All rights reserved. HTML + JavaScript: “© <script>document.write(new Date(). getFullYear());</script>. SE Rank Pro. All rights reserved.” This tiny code snippet makes sure your website always reflects the current year—without you lifting a finger (or opening your footer file). Copyright Footer Examples Using SE Rank Pro Let’s drive it home with some ready-to-use templates that feature your brand. ✔ Basic format:© 2025. SE Rank Pro. All rights reserved. ✔ Year range for active sites:© 2020–2025. SE Rank Pro. All rights reserved. ✔ With policy links:© 2025. SE Rank Pro. All rights reserved. | Terms | Privacy ✔ Auto-updating version (WordPress): © <?php echo date(“Y”); ?>. SE Rank Pro. All rights reserved. ✔ Auto-updating version (HTML): “© <script>document.write(new Date(). getFullYear());</script>. SE Rank Pro. All rights reserved.” ✔ With trademark note (if applicable): © 2025. SE Rank Pro. All rights reserved. SE Rank Pro® is a registered trademark. Is It Legally Required? In most countries (like the US or India), copyright exists as soon as the content is created. You don’t need to register or display anything. But the footer: In the US, you can register your copyright for extra protection—especially if you’re in a content-heavy business. But for most websites, a footer is enough to communicate ownership clearly. Copyright Footer vs. Terms and Conditions Your footer protects the content. Terms and Conditions protect your rules. If your site: You’ll need Terms and Conditions too. We recommend pairing them with your copyright line for full protection and legal clarity. Final Checklist Before You Publish ✅ Symbol or the word “Copyright”✅ Year (or range) correctly listed✅ SE Rank Pro as the owner✅ “All rights reserved” included✅ Footer appears on every page✅ Optional: links to legal documents Conclusion Learning how to write a copyright footer is simple—but skipping it is a common mistake even pros make. Think of it as your digital boundary line, quietly guarding your creativity and making your site look buttoned-up and legitimate. And remember, even if copyright is automatic, a footer makes it visible. It’s like locking your house and putting up a sign that says, “Protected by SE Rank Pro Security.” Okay, maybe not that dramatic—but close. Need Help? We’ve Got You Covered At SE Rank Pro, we don’t just teach you how to write a copyright footer—we help you build smarter, stronger websites from the ground up. As a trusted digital marketing company in Chandigarh, we offer complete website development, SEO, and branding services that protect your content and grow your traffic. Whether you’re launching your first blog or scaling a digital empire, our team is here to help you look good—and stay protected.
How to Convert Pixels to Inches
If you’ve ever stared at a design project and asked yourself, “Will this actually print right or just look great on screen?”—welcome to the club. One of the first technical hurdles graphic designers, digital artists, and even social media managers face is understanding how to convert pixels to inches. Whether you’re designing a logo, a website banner, or a print ad for that giant billboard (lucky you!), nailing down dimensions in inches is critical. This guide will walk you through everything you need to know about converting pixels to inches. And no, you don’t need to be a math genius or a graphic wizard—we’ll break it down for real-world use. What Is a Pixel, Anyway? A pixel (short for “picture element”) is the tiniest unit of a digital image. Think of it as one single Lego block in the mural of your image. Pixels are used in web design, image editing, and display screens, and they’re commonly abbreviated as “px.” But—and here’s the kicker—a pixel doesn’t have a fixed physical size. It only gains physical meaning (in inches, cm, or mm) when tied to a specific PPI (pixels per inch). Which leads us to… Why Convert Pixels to Inches in the First Place? Ah, the million-pixel question! Here’s why you should care about how to convert pixels to inches: Pixels vs DPI vs PPI – Clarifying the Jargon Before we get to how to convert pixels to inches, it helps to understand these three common acronyms: So, when converting, you’re usually working with PPI for digital screens and DPI for print formats. The Magic Formula: Converting Pixels to Inches Here it is—no complicated software required: Inches = Pixels ÷ PPI Let’s run a quick example: Voila! That’s how to convert pixels to inches in one simple step. Doing It Backward: Inches to Pixels Sometimes you know the final size (in inches) but need to find the pixel size to design at: Pixels = Inches × PPI Say you want a 5-inch wide image at 300 PPI: Pro tip: Always lock your aspect ratio when resizing, unless you’re aiming for the “funhouse mirror” aesthetic. Using Pixel to Inch Converter Tools Math not your thing? Don’t worry, the internet’s got your back. Here’s how most converters work: Some great online converters even come with tables, like: Pixels (px) Inches (at 96 PPI) 96 px 1 inch 300 px 3.13 inches 1080 px 11.25 inches Yes, it’s that easy. Common Scenarios for Conversion Challenges to Watch Out For Before you go converting everything in sight, be aware of: So while knowing how to convert pixels to inches is key, applying the right context is equally important. Bonus: How to Convert Pixels to Inches in MS Paint We get it—you’re old-school. Here’s a quick guide: Just know Paint has limited control over DPI—so if you’re aiming for print perfection, use Photoshop or Illustrator instead. Mastering how to convert pixels to inches is more than just a handy design skill—it’s essential to maintaining quality, consistency, and professionalism in your creative projects. Whether you’re crafting digital ads or prepping your art for print, these conversions ensure your design is seen exactly as intended. And if all this feels a little technical, don’t worry—that’s what we’re here for! At SE Rank Pro, we’re a results-driven, expert-led digital marketing company in Chandigarh that doesn’t just stop at design—we make sure your entire web presence is optimized, responsive, and beautiful across all screens and formats. Let us handle the pixels while you focus on the big picture.
How to Delete WordPress Site
The Complete Step-by-Step Guide (2025) If you’re here, chances are your WordPress site isn’t “sparking joy” anymore. Whether you’re rebranding, moving on to something new, or just tired of seeing that outdated theme from 2018, deleting a WordPress site might be the fresh start you’re looking for. But don’t just start swinging the virtual sledgehammer — let’s walk through the right way to do it. In this guide, we’ll show you how to delete WordPress site content properly — files, databases, domains, search engine footprints, and even ghostly echoes from the Wayback Machine. And yes, we’ll sprinkle in a few jokes to keep the digital funeral lighthearted. Step 1: Back Up Before You Break Up Before you even think about hitting delete, back up your WordPress site. Why? Because today’s “I’m done with this!” might become tomorrow’s “Where’s that blog post from 2022 I needed?” You can back up using plugins like UpdraftPlus, which let you store everything on Dropbox or Google Drive. If you’re feeling adventurous, you can also back up manually via cPanel. Just compress the public_html folder and export the database using phpMyAdmin. Remember: even breakups go smoother when you know you can get the photos back. Step 2: Delete Your WordPress Files Once you’ve made peace with the past, it’s time to start deleting. Log into your hosting account and head over to File Manager in cPanel. Open the public_html directory and select all files inside — that includes your wp-admin, wp-includes, and wp-content folders. Then hit delete. Alternatively, if you enjoy watching code disappear in real-time, use an FTP client like FileZilla. Just connect, navigate to your site folder, select all, and press delete. Congratulations! You’ve just taken the first real step in learning how to delete WordPress site data. Step 3: Erase the Database Your WordPress files are gone, but the heart (a.k.a. the database) is still beating. Time to give it the final nudge. Open phpMyAdmin from cPanel. Locate the database used by your site (you can confirm its name in wp-config.php). Then click “Drop” to delete it completely. Don’t forget to remove any users linked to it under “MySQL Databases.” At this point, you’ve successfully ghosted your website. Step 4: Cancel Hosting and Delete the Domain Don’t stop now! You’ll also want to: If your domain was registered with a different provider, head over there and follow their domain deletion or transfer steps. Otherwise, you’ll be left with a ghost domain no one can visit — kind of like that one Myspace page we all forgot about. Step 5: Remove from Google Search Results Even after deletion, your site might still show up on Google. That’s because search engines cache data. To fix that: For a more permanent solution, add a noindex tag to your content before deleting it. If your site is already gone, you can use Google’s Remove Outdated Content Tool to speed things up. Another fun fact in how to delete WordPress site content: it doesn’t end with Google. Bing, Yahoo, and others might still have it indexed. So check their documentation and repeat the process. Step 6: Clean Up on the Internet Archive Ah yes, the Wayback Machine — the place where your site might still be sipping digital martinis from 2016. Head over to archive.org/web and plug in your old domain. If snapshots appear, you’ll need to email the Internet Archive and request permanent removal. It’s like asking someone to delete those college photos from Facebook… only more official. Bonus: How to Delete a WordPress.com Site If your site lives on WordPress.com, the process is easier. Boom. Gone. But remember, once a WordPress.com address is deleted, it can’t be reclaimed — ever. So be very sure. Alternatives to Full Deletion Not 100% ready to go nuclear? You can: Sometimes, all your site needs is a fresh haircut — not a full identity change. Final Thoughts: So You Really Want to Delete? If you’ve followed all these steps, congratulations — you now know exactly how to delete WordPress site content permanently and responsibly. But before you log out forever, remember: deleting a site is serious business. It’s not just flipping a switch — it’s closing a chapter. So, do it smartly, back things up, and make sure this is the right choice for your digital future. Need Help With the Next Step? Whether you’re starting a new site, launching a rebrand, or exploring a fresh digital strategy, our Digital Marketing Company in Chandigarh can help. From SEO and web design to WordPress development, we turn your ideas into high-performing websites that don’t need deleting.
How to Unpublish WordPress Site
How to Unpublish WordPress Site: The Ultimate Step-by-Step Guide Let’s be honest—WordPress is awesome… until you realize your half-finished blog post about “10 Ways to Meditate With Your Cat” is live and ranking. Or maybe you’re rebranding, doing a site makeover, or just tired of that outdated “Under Construction” page from 2013. Whatever your reason, knowing how to unpublish WordPress site content—without breaking the internet—is a skill every site owner should have. In this guide, we’ll show you everything from unpublishing individual pages or posts to taking your entire site offline (temporarily or permanently). Whether you’re a newbie, a seasoned blogger, or someone who just wants the madness to stop—we’ve got you covered. What Does It Mean to Unpublish a WordPress Site? To “unpublish” means removing a site, post, or page from public view. It’s like turning the lights off in a room—you can still access it, but your visitors are left wondering if they walked into the wrong place. The good news? There’s more than one way to do it, depending on whether you want to hide a single post or take your entire website on a well-earned digital vacation. How to Temporarily Unpublish a WordPress Site Let’s start with a gentle approach. Maybe you’re planning a redesign or doing maintenance—you don’t need to delete the entire thing. Just throw up a friendly “we’ll be right back” message. Use a Maintenance Mode Plugin The easiest and safest way to temporarily unpublish your WordPress site is to use a maintenance mode plugin like SeedProd or LightStart. Here’s the quick version: Boom. Your site is hidden, your sanity is intact, and visitors won’t think your site was hacked by a time traveler from 2008. How to Completely Unpublish WordPress Site If you’re feeling bold and want to permanently unpublish your WordPress site, here are your options: Option 1: From WordPress.com Settings That’s it. The site will be gone, the URL will stop working, and your content will vanish unless you backed it up. Option 2: Through Hosting Dashboard (like Kinsta or cPanel) Pro tip: If you’re unsure about deleting your site, just switch to a temporary mode first. Hitting “Delete” without a backup is like formatting your phone while trying to set a new wallpaper. Risky business. How to Unpublish WordPress Pages or Posts (Without Deleting) 1. Switch to Draft Mode This is the most common method when you’re just updating or revising. Steps: The content is now hidden from visitors but safe for you to work on behind the scenes. 2. Use Bulk Actions Have multiple posts that need to go? Select them all, choose “Edit” from Bulk Actions, change status to “Draft,” and click Update. That’s mass unpublishing done right—no drama, no panic. 3. Set to Private or Password-Protected If you’re working on content meant only for clients or team members: This method keeps your content safe, selective, and far from the prying eyes of Google bots and nosy neighbors. Make Pages Members-Only (For Subscription Sites) Running a membership site? Use plugins like MemberPress to restrict access based on user roles. This works great for monetized content or lead capture strategies, giving your best material only to those who deserve (or pay for) it. Advanced Alternatives: Archiving or Scheduling Unpublishing Archive Instead of Unpublish Using plugins like LH Archived Post Status, you can “archive” old content—keeping it out of your blog feed but still accessible via direct link (and search engines, if you allow it). Automate Unpublishing Install PublishPress Future to schedule posts/pages to revert to draft or archive status automatically. Great for seasonal promos or flash offers that need to disappear like magic. SEO Considerations When Unpublishing Unpublishing isn’t just a design decision—it can affect your traffic too. Here’s how to protect your rankings: Don’t let your SEO work go to waste. If you’re not careful, Google might think your site ghosted it. Final Thoughts Learning how to unpublish WordPress site content is like having a digital pause button. Whether you’re unpublishing a page, a blog post, or your entire site, you now know how to do it cleanly, strategically, and with minimal stress. Just remember—hit that “Delete” button only when you’re really, really sure. Otherwise, stick to drafts, private modes, or maintenance plugins. Your future self (and your visitors) will thank you. Need Help Unpublishing or Rebuilding Your Website? At SE Rank Pro, we’re not just another digital marketing Company in Chandigarh. We specialize in all things WordPress—from unpublishing strategies to SEO optimization and complete redesigns. Whether you’re hitting pause or planning a comeback, we’ve got the tools, experience, and coffee to make it happen. Let us handle the tech, so you can focus on what matters most—your business.
How to Change Font in WordPress: The Ultimate Beginner’s Guide
Changing your website’s font might not sound like a big deal—until you realize your site looks like it’s stuck in a 1995 WordArt competition. Fonts aren’t just about aesthetics—they’re about branding, user experience, and whether people feel comfortable staying on your site. The good news? If you’re wondering how to change font in WordPress, you have plenty of options. Whether you’re using a block theme, a classic one, or you’re a plugin fanatic, there’s a method for everyone—from total beginners to CSS warriors. Let’s walk you through all the ways you can upgrade your WordPress typography game. What Are Web Fonts and Why Do They Matter? Web fonts are like outfits for your words. Serif fonts wear tuxedos. Sans-serifs sport a clean business-casual look. Script fonts are your overly fancy cousin who wears calligraphy to brunch, and Display fonts… well, they’re just loud. In WordPress, web fonts come from sources like Google Fonts, Adobe Fonts, and more. You can embed them directly, load them via plugins, or use your theme’s built-in settings to make your website look sharp and feel on-brand. Why You Might Want to Change Fonts in WordPress The default font in your WordPress theme might work just fine—but it might also look like Times New Blah. Here’s why you should consider switching: So if you’re still asking how to change font in WordPress, you’re already on the path to better branding. How to Change Fonts in WordPress (6 Methods for All Skill Levels) Theme Customizer (No-Code, No-Stress) Most WordPress themes come with a Typography section under Appearance → Customize. From here, you can select fonts for your headings, body, and sometimes even buttons and menus. Themes like Astra and OceanWP offer robust font controls—even presets that pair well together (because nobody wants Comic Sans with Cursive… ever). If you don’t see the Typography section, it may mean your theme uses the new Full Site Editor (more on that next). Full Site Editor (For Block-Based Themes) If you’re using a block theme like Twenty Twenty-Two or Twenty Twenty-Three, go to Appearance → Editor. Click on the Styles icon, then Typography, and voilà—you can update fonts for text, headings, and links. Bonus: With Full Site Editing, you can also customize spacing and appearance settings like line height and font weight—perfect for designers who need every pixel to obey. Gutenberg Block Editor (Great for One-Off Posts) Want to spice up a single blog post or page? The Gutenberg block editor lets you tweak font size, weight, and color right within the block settings. Just remember: this method won’t change your entire site—just the content you’re working on. So if you want a global change, this isn’t the method to marry. Use a Plugin (Beginner-Friendly and Versatile) Still unsure how to change font in WordPress without code? Plugins are your best friend. Top choices include: Most plugins work through the Customizer and offer real-time previews. Easy peasy. Page or Theme Builders (Like Divi or SeedProd) If you’re using a page builder like Divi or SeedProd, you’ve got built-in font controls for every module. You can apply global font settings or customize each section individually—ideal for sites that need a more tailored look. For example, Divi includes the full Google Fonts library and lets you change line height, letter spacing, font styles, and more—all from its visual builder. Manually Add Fonts (For the Brave and Bold) Feeling adventurous? You can manually embed fonts by: This route gives you full control (and street cred among developers). But please—use a child theme unless you want to break your site and become best friends with your hosting support team. Best Practices When Changing Fonts in WordPress Final Thoughts There’s no one-size-fits-all answer for how to change font in WordPress—and that’s the beauty of it. From easy plugins to advanced coding, you have the tools to make your website look exactly how you want. So ditch that default font that screams “template” and give your brand a fresh, personalized voice. Bonus Tip from a Digital Marketing Company in Chandigarh At SE Rank Pro, we’ve helped hundreds of WordPress site owners not just change fonts, but elevate their entire brand presence through smart design, SEO, and CRO strategies. If you’re feeling overwhelmed or just want a pro to handle it all, we’re here to help. From custom typography to full WordPress makeovers—your site deserves better fonts and better results. Contact your trusted digital marketing company in Chandigarh today!
What Happens to a Media File When You Delete It from the Media Library in WordPress?
If you’ve ever tried spring cleaning in
How to Fix 403 Forbidden Error

A Simple Step-by-Step Guide Imagine you’re all set to visit your favorite website — maybe to check your latest blog, manage your online store, or (let’s be honest) stalk your competitors — and suddenly, boom: “403 Forbidden Error” flashes on your screen. It’s like being locked out of your own house with the keys still in your pocket. Frustrating? Absolutely.Fixable? You bet. In this detailed guide, we’ll break down how to fix 403 forbidden error easily, even if you’re not a tech wizard. So let’s dive right in and reclaim access to your site! What Is the 403 Forbidden Error? The 403 Forbidden Error is an HTTP status code that means your request was understood by the server, but it refuses to authorize access.In simpler words — the server knows what you want but doesn’t trust you enough to let you in. Some common versions you might see include: If it feels personal, don’t worry — it’s not you. It’s usually a configuration or permission issue behind the scenes. What Causes the 403 Forbidden Error? Several culprits could be behind this frustrating barricade: Now that we know the villains, let’s become the hero by learning how to fix 403 forbidden error step-by-step. How to Fix 403 Forbidden Error (Your Rescue Plan) 1. Clear Your Browser Cache and Cookies Browsers can hold on to outdated information longer than necessary — like your clingy high school friend.Clear your cache and cookies from browser settings and reload your site.It’s a simple trick that works surprisingly often! 2. Refresh the Page and Double-Check the URL Sometimes, all it takes is a simple hard refresh or correcting a mistyped URL to clear the error.(Yes, even an extra “slash” at the end of a URL can cause chaos.) 3. Disconnect Your VPN (If Using One) If you’re browsing under a VPN disguise, your server might see you as suspicious. Try turning off the VPN or switching servers to see if that lifts the 403 curtain. 4. Deactivate CDN Temporarily Content Delivery Networks (CDNs) can sometimes cache errors. Temporarily disable your CDN and recheck.No CDN drama? Move on to the next step. 5. Scan for Malware Some malware loves to mess up your site’s access rules.Use tools like Wordfence or Sucuri to scan your site thoroughly.If malware is detected, clean it immediately and breathe a little easier. 6. Restore or Regenerate the .htaccess File A corrupted .htaccess file is a usual suspect for 403 errors. Voilà! One potential headache down. 7. Reset File and Directory Permissions Your files and folders have permission settings — and if they’re wrong, you’ll get a 403.Using an FTP client like FileZilla: Trust me, your server will appreciate the clear instructions. 8. Deactivate All WordPress Plugins Sometimes a single rogue plugin can cause all the ruckus.Temporarily deactivate all plugins (by renaming your plugin folder) and reactivate them one by one to find the troublemaker.(Pro Tip: Deactivate suspicious ones with catchy but sketchy names first!) 9. Verify A Record and DNS Settings Ensure your domain points to the correct server IP address.Check your DNS settings from your hosting dashboard or domain registrar panel. A wrong A record is like sending your mail to the wrong house — no wonder it gets rejected! 10. Upload an Index Page Your root directory needs an index.html or index.php file.No index file? Your server gets confused and blocks access. Simply upload a basic index file, and your site might magically reappear. 11. Edit File Ownership (for VPS Users) If you’re managing your own VPS (virtual private server), check that your files are owned by the correct user account using SSH commands like ls -l and chown. (If you just said “What is SSH?”, it’s totally okay — you might want to call tech support for this part.) 12. Still Stuck? Contact Your Hosting Provider If none of these steps work, don’t despair.Contact your hosting support team. They often have access to server-level logs and can spot issues you can’t see from the outside. How to Prevent Future 403 Errors A few preventive steps today can save a lot of hair-pulling tomorrow. Conclusion: You’re Back In! Now you know exactly how to fix 403 forbidden error — from browser tricks to file permissions and everything in between.It might feel a little technical, but with a bit of patience, you can rescue your site and get back to what you do best. If you found this guide helpful and need professional help keeping your website error-free, growing your SEO, or boosting your traffic —our team at digital marketing Company in Chandigarh is here to help! 🚀At SE Rank Pro, we specialize in making your digital presence smoother, stronger, and stress-free. Get in touch today — because your website deserves nothing but the best!
What Are Triadic Colors?
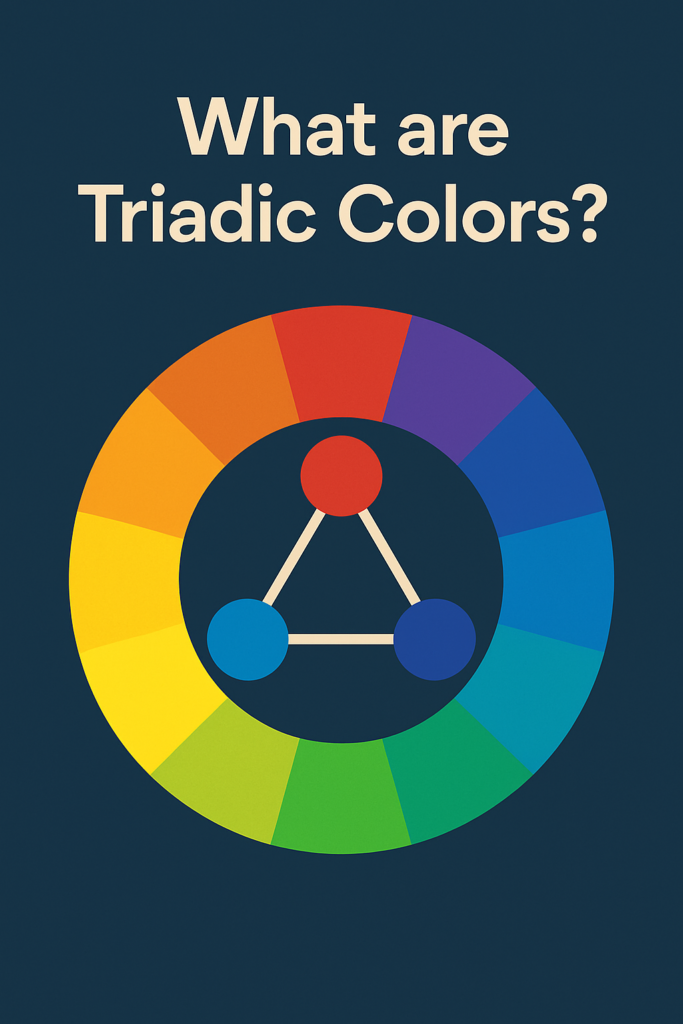
A Vibrant Guide to Design Harmony When it comes to design, there’s one universal truth: colors aren’t just colors—they’re emotions in disguise. Over 60% of people accept or reject a brand based on its colors alone. That’s why when you think of Coca-Cola, you feel “red,” McDonald’s screams “yellow,” and Starbucks whispers “green serenity” in your ear. Picking the right colors isn’t just about aesthetics; it’s about creating a memorable brand personality. And one of the most powerful tools in a designer’s toolbox is a fascinating concept: triadic color schemes. So today, let’s dive deep into answering the question: what are triadic colors, and why are they such a game-changer? What Are Triadic Colors? If you’ve ever tried to mix and match colors and ended up with a result that looked like a toddler’s art project gone rogue—don’t worry, you’re not alone. What are triadic colors, you ask? They’re three colors that are evenly spaced around the color wheel, forming a perfect triangle. Famous examples include: Unlike complementary colors (which sometimes clash like two egos in a reality show), triadic colors maintain balance while offering strong contrast. It’s the best of both worlds: vibrant yet harmonious. No drama, just pure magic. How Triadic Color Schemes Work Here’s the basic recipe: Understanding the color wheel is crucial here. The emotional impact of your dominant color leads the show: A good triadic scheme can make your audience feel something before they even realize it. (And trust me, making people feel things in marketing is half the battle won.) How to Select the Perfect Triadic Color Scheme Now that you’re wondering not just what are triadic colors but also how to use them, here’s a foolproof plan: 1. Set the Context What mood do you want your design to convey—joy, trust, excitement, rebellion? 2. Choose the Lead Color This color should match your brand’s essence. Fintech startups often go blue for trust; kids’ brands often go orange for energy. 3. Pick Accents Find the two colors equally spaced on the wheel from your dominant color. 4. Check for Harmony Use tools like Adobe Color or Coolors to see if your triad looks like a Picasso… or a crime scene. 5. Follow the 60-30-10 Rule 60% dominant color, 30% secondary color, 10% accent. It’s the golden ratio of design. 6. Test for Accessibility Ensure enough contrast for readability—because even the most gorgeous palette is useless if half your audience can’t read your text. Real-World Examples of Triadic Color Schemes Sometimes the best way to answer “what are triadic colors” is to see them in action: How Different Industries Use Triadic Colors No matter your field, triadic colors offer a way to make your visuals both powerful and pleasantly cohesive. Common Triadic Color Combinations to Try Want to impress your clients—or just your own Instagram followers? Try these combos: Start experimenting—you might just stumble onto the next visual trend before it even hits Pinterest. Quick Tips for Mastering Triadic Colors Conclusion: The Takeaway Understanding what are triadic colors is like getting a secret key to design success. These vibrant trios help you create harmony, evoke emotions, and build powerful brand impressions. While not every project needs a full-blown triadic explosion, knowing how to apply it thoughtfully gives you a major creative edge. So grab a color wheel, unleash your inner Picasso, and make designs that not just look good—but feel right. And if you’re looking for someone to help your branding, web design, or marketing visuals stand out using expert color psychology, that’s where we come in. At SE Rank Pro, we are a leading digital marketing company in Chandigarh that understands not just how to market your brand but how to make it unforgettable. If you ever need help crafting powerful designs and vibrant branding strategies, our digital marketing company in Chandigarh is just a click away. Ready to turn heads? Let’s get colorful!
How to Fix 400 Bad Request
We’ve all been there. You’re browsing a website, maybe trying to check out a product, submit a form, or even just log in—and bam! You’re greeted with the uninviting message: “400 Bad Request.” It’s the digital equivalent of someone saying, “I have no idea what you just said, please try again.” If you’ve found yourself wondering how to fix 400 bad request, you’re not alone—and fortunately, you’re in the right place. Let’s break down what this pesky HTTP status code means, why it happens, and how to get rid of it once and for all (without needing a computer science degree). What Does a 400 Bad Request Error Actually Mean? The 400 Bad Request error is an HTTP status code that indicates your browser sent a request to the server that the server couldn’t understand. It’s a client-side issue, meaning the problem lies somewhere in your device, browser, or network—not on the website you’re trying to access. This error might appear as: Let’s decode the digital grumbling and show you how to fix 400 bad request in a few practical steps. Common Culprits Behind a 400 Bad Request Before diving into the solutions, it helps to understand the common causes: Now let’s look at how to fix 400 bad request using some foolproof methods. 1. Double-Check the URL (Yes, Typos Count) This one seems obvious, but it’s often overlooked. One wrong character—like an extra space, a misplaced %, or a missing slash—can confuse a server into rejecting your request. Pro Tip: Use a URL encoder/decoder tool if the address looks like ancient hieroglyphics. 2. Clear Your Browser’s Cache and Cookies Over time, your browser stores a ton of temporary files and cookies that help websites load faster. But when they get outdated or corrupted, they can cause all kinds of hiccups—including the 400 Bad Request error. How to do it: Bonus tip: It might log you out of websites, but that’s a small price to pay for digital peace. 3. Disable Your Browser Extensions Browser extensions are like overzealous coworkers—helpful until they start messing things up. Some extensions, especially ad blockers or privacy tools, can interfere with requests or inject bad headers. Disable them one by one and refresh the page to isolate the culprit. 4. Flush Your DNS Cache DNS is your computer’s phone book for websites. Sometimes the contact info (IP address) stored in it is outdated or incorrect. For Windows: ipconfig /flushdns For macOS: sudo dscacheutil -flushcache; sudo killall -HUP mDNSResponder Flushing the DNS is like restarting your computer’s memory for the internet. It often works like a charm. 5. Reduce the Size of Uploaded Files Trying to upload a 300MB video where the site only allows 100MB? The server will respond with a 400 error faster than you can say “compression.” Use tools like: If you’re using WordPress, plugins like WP Upload Size can help you increase the max upload limit—just don’t go too wild. 6. Log Out and Log Back In (WordPress Users) Session data in WordPress can go stale. Logging out and logging back in is like shaking the Etch A Sketch and starting fresh. 7. Deactivate Themes and Plugins (WordPress Again) If the error appeared after installing a new theme or plugin, deactivate it. Can’t access the dashboard? Use FTP or your hosting file manager, navigate to /wp-content/plugins/, and rename the suspect plugin folder. WordPress will automatically deactivate it. 8. Restart Your Device or Switch Networks A slow or unstable connection might be garbling the request. Restart your modem/router or switch to a different connection (like mobile data) to test. Still seeing the error on multiple devices and browsers? It could be a server-side misconfiguration—time to contact the website admin. Monitoring and Preventing 400 Errors on Your Own Website If you run a website, especially on WordPress, prevention is better than cure. Here’s how to avoid seeing your visitors bounce from a 400 error: Conclusion: Fix It, Don’t Fear It So, there you have it—a complete breakdown of how to fix 400 bad request in practical, human language. Whether it’s clearing cache, fixing a URL typo, or compressing a file, these steps are more than enough to solve the majority of 400 errors. But if you’re a business owner or managing a WordPress site and find yourself running into errors too often, maybe it’s time for a more robust solution. We’re SE Rank Pro, a results-driven digital marketing company in Chandigarh that not only helps you fix annoying issues like these but also builds, optimizes, and grows your online presence. From SEO to WordPress troubleshooting, we’ve got your back—minus the tech jargon.
What Is the Difference Between JPG and JPEG?

A Simple Yet Complete Guide Have you ever saved an image, glanced at the file extension, and noticed sometimes it ends in .jpg, and other times, .jpeg? Cue the digital head-scratching. If you’ve been wondering what is the difference between JPG and JPEG, you’re not alone—and the good news is, the answer isn’t complicated. It’s actually a fun peek into computing history. Let’s break it down, pixel by pixel. What Is JPEG? JPEG stands for Joint Photographic Experts Group, the committee that created the standard back in 1992. JPEG is not just a file extension; it’s a compression algorithm that makes image files smaller while preserving visual quality. That’s why it’s a go-to format for web images, digital photography, and any file that needs to load quickly without looking like it’s been through a paper shredder. JPEG uses lossy compression, which means that it reduces file size by selectively discarding image data. You’ll lose a bit of quality, but for most purposes—like website banners or social media uploads—you won’t even notice. What Is JPG? Now, here comes the twist in the tale. JPG is exactly the same as JPEG. They are not twins. They are literally the same person going by a nickname. Why the difference, then? Well, back in the days of MS-DOS and early Windows systems, file extensions were limited to three characters. So .jpeg had to be trimmed down to .jpg to fit the format. Meanwhile, Mac and Linux systems had no such limitation and continued using .jpeg. Once Microsoft dropped the 3-character restriction, both .jpg and .jpeg became acceptable—and now both versions coexist peacefully, much like tea and coffee drinkers in the same office. What Is the Difference Between JPG and JPEG? Let’s get to the main question: what is the difference between JPG and JPEG? Technically—none. Functionally—none. It’s all in the file extension. Both formats use the same compression method, support the same color depth, and work in the same way across virtually all software and devices. You can rename a .jpg file to .jpeg or vice versa and the image will open just fine. It’s a classic case of “tomato, tomahto.” This means you don’t need to stress over which to use. Choose whichever is supported by your device or software, and you’re good to go. A Quick Look at JPEG 2000 Ah yes, the lesser-known cousin: JPEG 2000. This format was introduced to improve upon JPEG with better compression, lossless options, and enhanced image quality. Sounds great, right? So why isn’t everyone using it? Because JPEG 2000 is resource-intensive, not widely supported by browsers, and rarely offered as an option in standard image editing tools. It’s like having a gourmet coffee machine in a room full of instant coffee lovers. Impressive—but not practical for most. Raster vs. Vector: Why It Matters Both JPG and JPEG are raster image formats, meaning they are made up of pixels. This is great for photographs and detailed images but not ideal for graphics with hard lines or when scalability is important (think logos). Raster images can lose quality when resized. For projects where you need crisp lines and infinite scaling, go for a vector format like SVG or EPS. But for real-world photos and rich web imagery, JPG or JPEG is your best friend. Converting Between JPG and JPEG Since they’re the same format, converting between them is as simple as changing the file extension. Here are some common ways to do it: No need to install heavy-duty software or call IT. If you can rename a file, you can convert it. When Not to Use JPG/JPEG While JPEG is great, it’s not perfect for every scenario. Avoid it when: JPEGs blend colors to reduce file size, which can make sharp edges look fuzzy. It’s like trying to cut a steak with a butter knife—it’ll work, but it’s not ideal. Compressing JPEG Files for Web Use If you’re managing a website, image optimization is critical for performance. Large image files slow down loading speeds, which can hurt both user experience and SEO. Here are a few helpful plugins: These tools help you keep file sizes lean without sacrificing too much quality—kind of like a protein shake that actually tastes good. Wrapping Up: What Is the Difference Between JPG and JPEG? Let’s recap. What is the difference between JPG and JPEG? Nothing. Nada. Zilch. The different extensions stem from old limitations in Windows file naming conventions. Today, both file types are used interchangeably, support the same features, and are equally accepted by browsers, design tools, and CMS platforms. So next time you’re wondering which to use, relax. You can flip a coin, or just go with whatever your software defaults to—it really doesn’t matter. Need Help with Image Optimization or Website Speed? At SE Rank Pro, we help businesses improve their website performance from the ground up. Whether it’s compressing images for faster load times or improving your on-page SEO, our expert team ensures you stay ahead in the digital game. We’re a results-driven digital marketing company in Chandigarh, and we know that even small things like the right image format can impact your performance, ranking, and user experience. So if you want speed, style, and success—partner with SE Rank Pro, the trusted digital marketing company in Chandigarh that gets it done right.