Prior knowledge of below items will help understand the article better:
- M365 Account details
- Power App – Canvas App
- Microsoft Outlook
Introduction
Often we are asked to open default email apps like Outlook with a pre-populated Subject and Body on a button click from a Power App – Canvas App. Usually, sending an email can easily be achieved using a Power Automate flow, but in this article Compose Email Using Mailto in Power App, we will not use Power Automate. Instead, we will leverage the simple and effective mailto PowerApps option.
This tutorial not only walks you through the steps but also explains how mailto PowerApps works, why it can be better in some cases than Power Automate, and how you can extend it for real-world business scenarios.
What is Mailto in PowerApps?
Before diving into steps, let’s quickly understand what mailto: is.
The mailto protocol is a standard way to open a user’s default email client with pre-filled details like recipient, subject, or body. For example:
mailto:test@example.com?subject=Hello&body=This is a test emailIn PowerApps, we can leverage this functionality using the Launch() function. Instead of coding a backend email service, the app simply triggers the user’s email application, saving time and effort.
This approach is lightweight, doesn’t require connectors, and works instantly across devices (desktop & mobile).
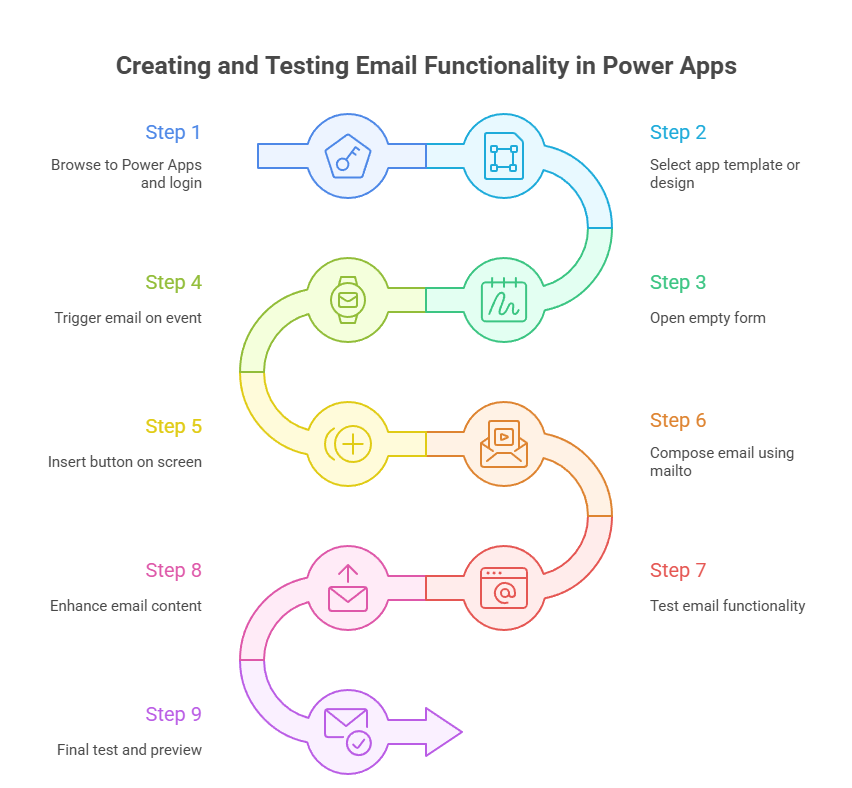
Open Power Apps and create a new Canvas App
Below is the step by step way to compose email using mailto in Power Apps – Canvas App:
NOTE: In case you already have a Power App – Canvas App created, you can ignore first 3 steps and jump to Step 4
Step 1:
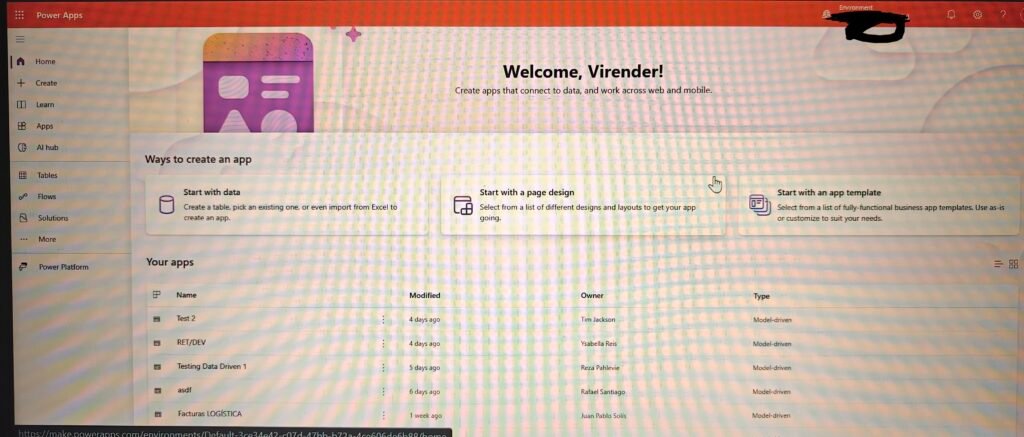
Browse to here and provide your M365 account details to login
Step 2:
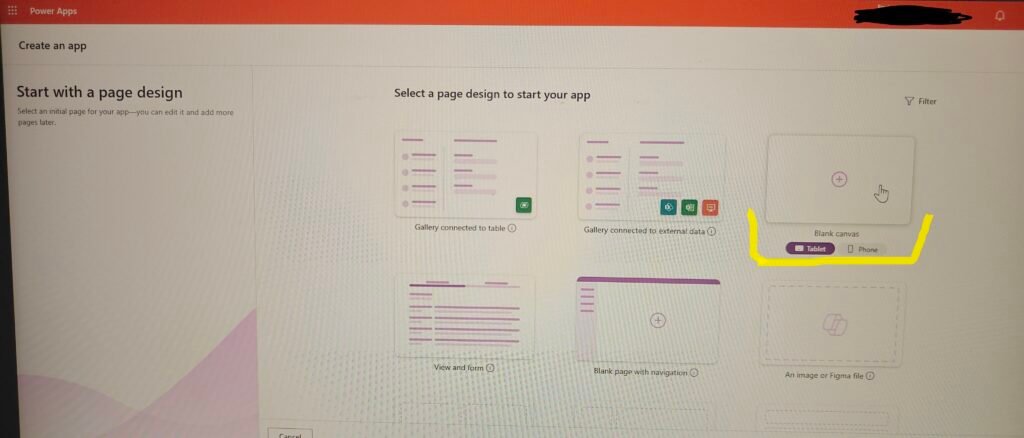
Below page will open and you can select either a app template to start your Power App – Canvas App or you can select to start with data or you can select to start with a page design (design created in figma will work for this option). Make sure you select the right layout you want to build this app for.
For my example I am selecting “Start with a page design” and under that “Blank canvas app with Tablet layout” highlighted with yellow color in the below image.
Step 3:
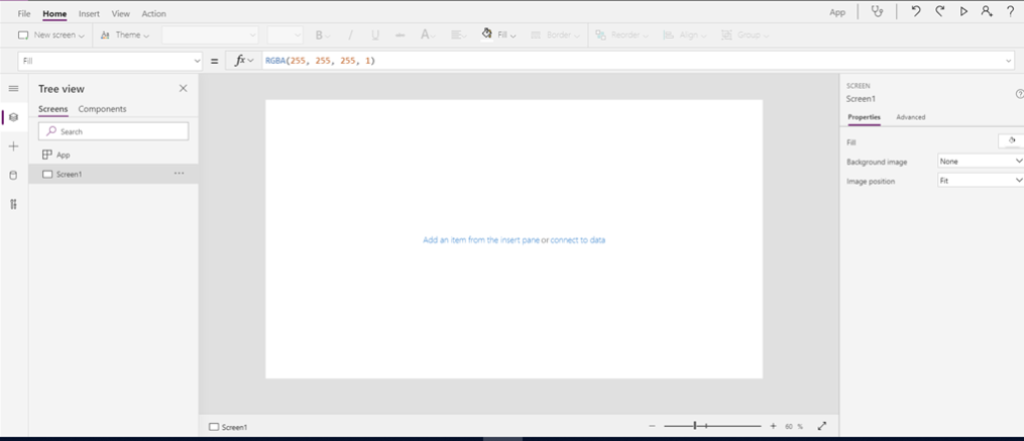
Empty form will be opened after you click on the Tablet layout
Compose email for the default email app
Step 4:
You can trigger the email on any event in Power apps – Canvas app as per your requirement. It can be a button onSelect or it can be onChange or it can be even on Checkbox OnUnselect
In my example, I will send it on click of a button with pre-populated subject and body.
Step 5
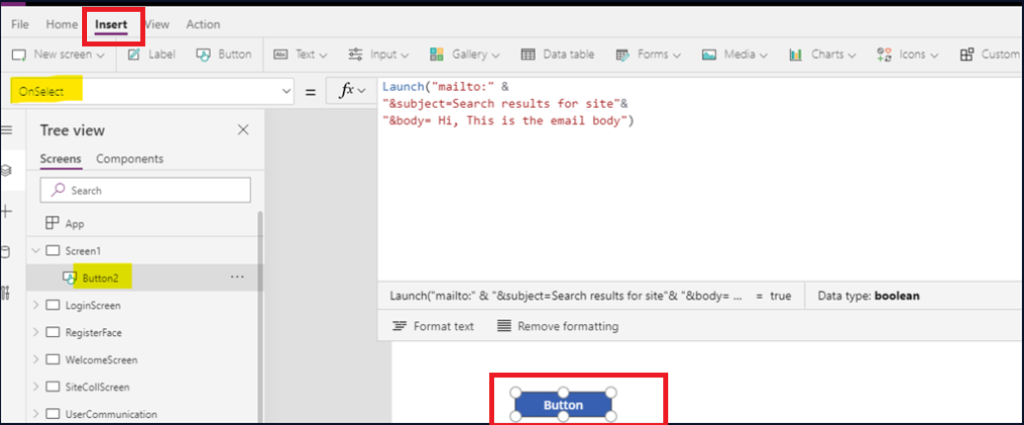
Now select the “Insert” from the ribbon and then select “Button” to add the button on the empty screen. As shown in the below image with red color boxes.
Step 6
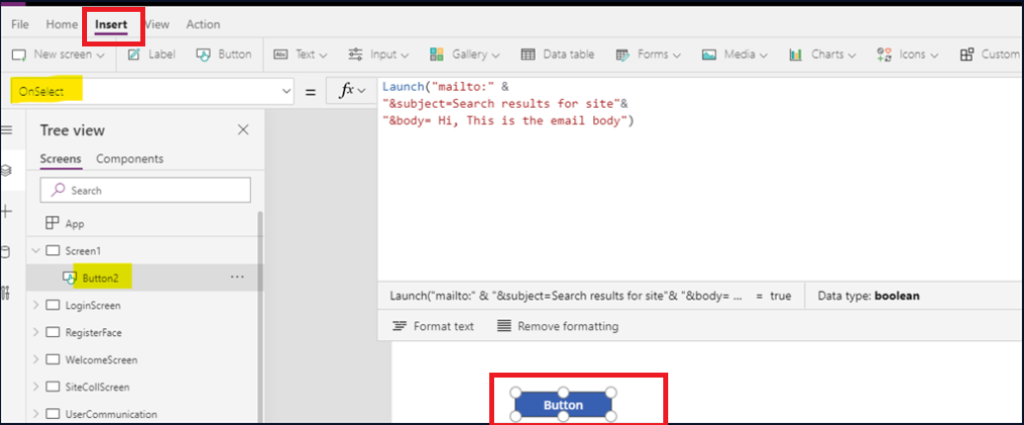
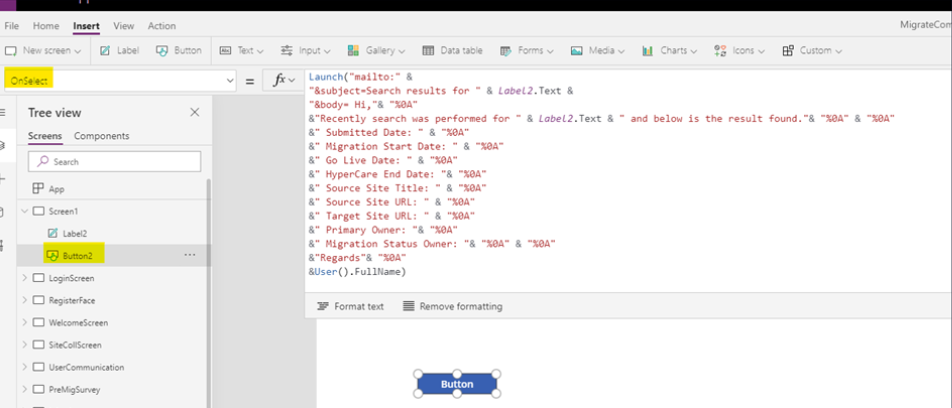
“OnSelect” property of the button compose your email subject and body using mailto, as shown in the image with yellow highlight.
Note: Here I am not passing “to”, “cc” and “bcc” addresses, as I want user to enter those in Outlook.
Below is the code:
Launch(“mailto:” &
“?subject=Search results for site”&
“&body= Hi, This is the email body”)
Step 7:
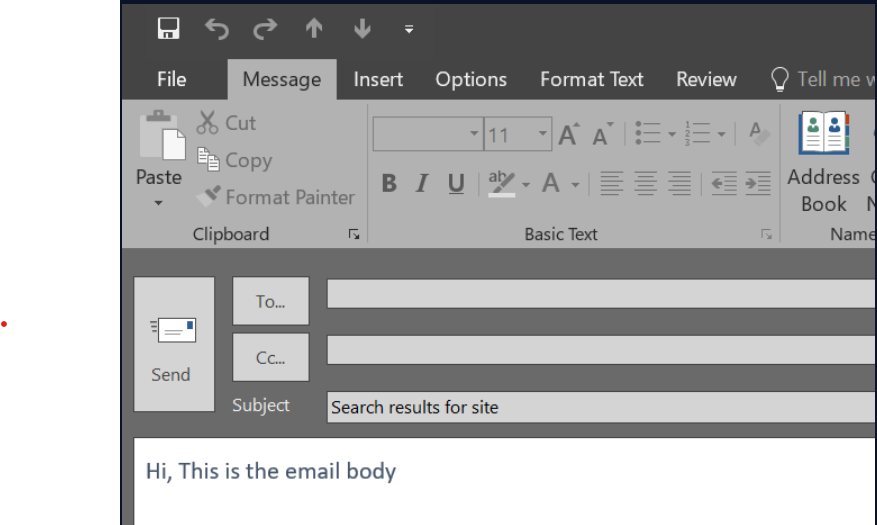
Test the functionality using preview (F5), click on the button. In my example Microsoft Outlook get open and email with subject and body get created
Step 8:
In order to make it more professional we can provide more content and bring some content to the next line in the email body with some details coming from other controls in Power App – Canvas App.
Below I am using “%0A” for moving content to the next line.
Launch(“mailto:” &
“?subject=Search results for site” &
“&body= Hi,”& “%0A”
&”Recently search was performed for site and below is the result found.”& “%0A” & “%0A”
&” Submitted Date: ” & “%0A”
&” Migration Start Date: ” & “%0A”
&” Go Live Date: ” & “%0A”
&” HyperCare End Date: “& “%0A”
&” Source Site Title: ” & “%0A”
&” Source Site URL: ” & “%0A”
&” Target Site URL: ” & “%0A”
&” Primary Owner: “& “%0A”
&” Migration Status Owner: “& “%0A” & “%0A”
&”Regards”& “%0A”
&User().FullName)
Step 9:
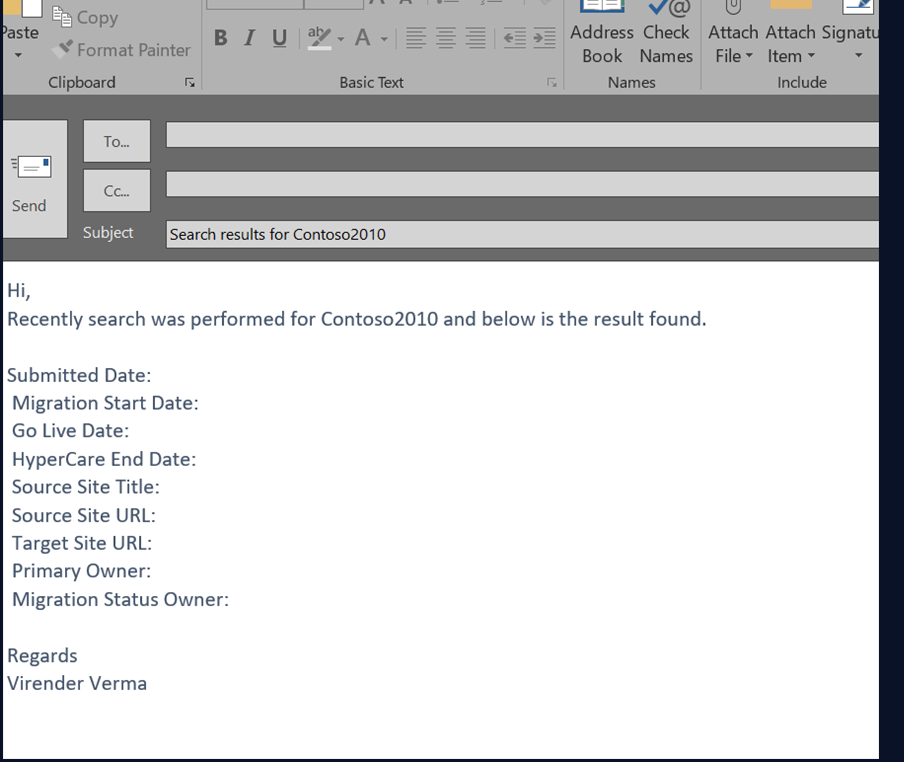
Test the functionality using preview (F5), click on the button. In my example Microsoft Outlook get open and email with subject and body get created.
Why Use Mailto Instead of Power Automate?
Both Mailto and Power Automate can send emails, but they serve different purposes.
When to Use Mailto PowerApps:
- You want a quick, lightweight solution.
- Users prefer sending from their own Outlook/Gmail.
- Emails are one-off (not mass communication).
- You don’t want to depend on connectors.
When to Use Power Automate:
- Automated workflows (e.g., approvals, bulk updates).
- Sending system-generated emails.
- Logging/tracking sent emails.
- Advanced formatting or attachments.
👉 In short: Mailto PowerApps is ideal for simplicity, Power Automate is for automation.
Advanced Mailto Parameters in PowerApps
Mailto links can do more than just subject and body. You can also:
Pre-fill recipients:
mailto:someone@example.com?cc=manager@example.com&bcc=hr@example.com
Insert dynamic values from PowerApps controls:
Launch("mailto:" & "?subject=Ticket Update - " & TextInput1.Text & "&body=Dear User,%0AYour ticket ID " & TextInput2.Text & " has been resolved.")
Line breaks & formatting: Always use %0A for new lines and %20 for spaces.
❌ Limitation: Mailto does not support attachments. For that, you’d need Power Automate or Outlook connector.
Real-World Use Cases of Mailto PowerApps
To better understand the value of mailto PowerApps, here are a few practical examples:
- HR Apps → Pre-filled job application or leave request emails.
- Sales Apps → Quick client follow-ups with deal summaries.
- IT Helpdesk Apps → Create tickets by clicking a button.
- Education Apps → Allow students to send structured queries to faculty.
These scenarios show how mailto: can reduce friction and save time for both end-users and businesses.
Common Issues & Troubleshooting
While Mailto is simple, you might run into some issues:
- Not working on Chrome: Needs a default mail client configured.
- Outlook vs Gmail behavior: Different formatting support.
- No default email app: Mailto won’t work if the user hasn’t set one.
- Attachments not supported: You’ll need other methods for files.
👉 Always test your solution on multiple browsers and devices before rollout.
Best Practices for Using Mailto in PowerApps
If you’re planning to use Mailto frequently, follow these best practices:
- Keep subject lines short and clear.
- Use
%0Afor neat formatting instead of long single-line bodies. - Personalize emails with values from PowerApps forms.
- Provide user instructions in-app before triggering Mailto.
- Test across desktop & mobile to avoid surprises.
Alternatives to Mailto in PowerApps
If Mailto isn’t enough, you can try:
- Office365Outlook.SendEmail() → Sends directly from PowerApps without user intervention.
- Power Automate Flow → For bulk or automated emails.
Both offer more control but come with complexity. Mailto remains the easiest way to send personalized, user-initiated emails.
Final Thoughts
There are many ways of sending email to the users like for example calling power automate flow from the Power Apps – Canvas App but this article Compose Email Using “Mailto” In Power App – Canvas App gives a simple alternative using a very simple technique and function where you can modify this example to your requirements.
How We Can Help
If you feel overwhelmed by all the steps on Compose Email Using “Mailto” In Power App – Canvas App, don’t worry — that’s where we come in. As a trusted Digital Marketing Company in Chandigarh, we not only help businesses with marketing strategies but also assist with custom app development, workflow automation, and programming requirements to make your processes smoother. You can get in touch with us via email or phone, and we’ll be glad to help.

