Let’s face it—committing to a WordPress plan can feel like a relationship. At first, it’s exciting, everything’s shiny and promising. But somewhere down the line, maybe the budget tightens, or you find a better CMS match, and it’s time to say, “It’s not you, it’s me.” That’s when you need to know exactly how to cancel WordPress subscription without accidentally nuking your site or missing out on refunds.
In this guide, we’ll walk you through how to cancel a WordPress subscription, whether you’re using WordPress.com or the more DIY-style WordPress.org. Each comes with its own roadmap, and trust us—knowing the difference is half the battle.
Step 1: Know Your WordPress Type Before You Cancel
You’d be surprised how many users try to cancel something they don’t actually have.
WordPress.com is the fully hosted service where WordPress handles hosting, backups, and security. You may be subscribed to a Personal, Premium, Business, or eCommerce plan.
WordPress.org is self-hosted. That means you’re paying a third-party provider for hosting, domain registration, or premium plugins/themes. Canceling here involves logging into other platforms—not WordPress itself.
Knowing which one you’re using is the first real step in mastering how to cancel WordPress subscription properly.
Step 2: How to Cancel WordPress.com Subscription
Canceling from WordPress.com is usually smooth, but here’s a clear checklist:
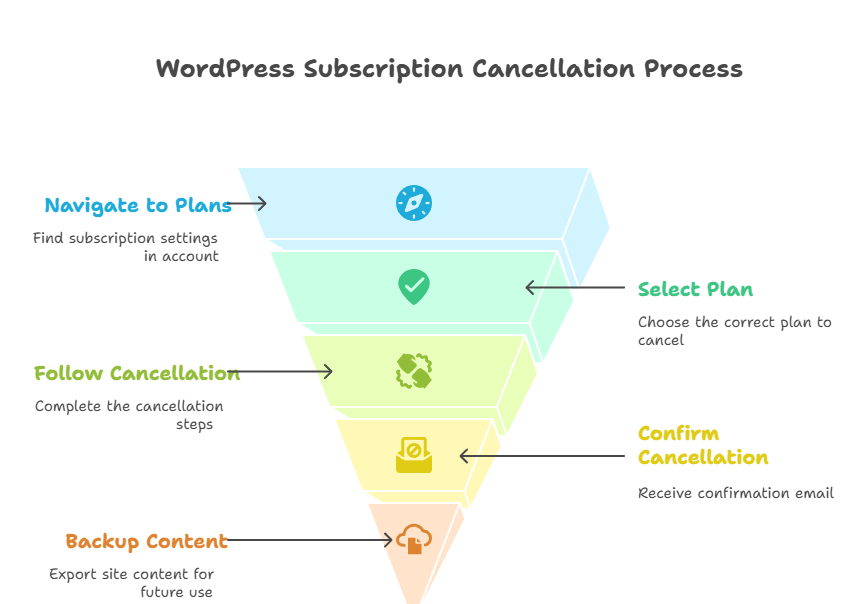
2.1 Log In to Your Account
Head to WordPress.com and log in using your credentials. Easy enough.
2.2 Navigate to Plans or Subscriptions
Click your profile photo → go to Account Settings → locate Plans or Subscriptions.
2.3 Select the Plan to Cancel
You may see more than one plan (thanks, “Free Domain” add-ons). Make sure you’re canceling the correct one.
2.4 Follow the Cancellation Process
Click on “Manage” or “Cancel Plan.” WordPress might try to woo you with discount offers like a clingy ex. Politely decline and move on.
2.5 Watch Your Inbox
A cancellation confirmation email will arrive—keep it like you keep your coffee receipts, just in case.
2.6 Backup Before You Break Up
Export your site content via the Tools > Export feature. Trust us, your future self may want that old blog post about banana bread.

Step 3: What About WordPress.com Refunds?
Refunds follow a don’t-blink-or-you’ll-miss-it logic:
- Annual Plans: Refundable within 30 days
- Monthly Plans: Typically non-refundable
- Add-ons: Case by case—reach out via chat or email
If you fall within the refund window, initiate it immediately. Their live chat team is usually responsive (and surprisingly empathetic).
Step 4: How to Cancel WordPress.org (Self-Hosted)
This is where people go wrong. You don’t cancel with WordPress—you cancel with your hosting provider.
4.1 Log In to Your Hosting Dashboard
Think Bluehost, SiteGround, Hostinger—whoever you signed up with.
4.2 Go to Billing/Subscription Section
The label might vary: “Billing,” “My Services,” “Renewals.” Explore a little.
4.3 Cancel the Hosting Plan
Click “Cancel” or “Turn Off Auto-Renew.” Some hosts will require you to speak with support (bring coffee).
4.4 Handle the Domain
Decide whether to:
- Let the domain expire
- Transfer it elsewhere (GoDaddy, Namecheap)
- Keep it for future use
Domains are like digital real estate—don’t let them expire unless you’re sure you’re done.
4.5 Backup Your Site
Use UpdraftPlus, Jetpack Backup, or good ol’ FTP and phpMyAdmin export. We had a client who didn’t back up his site. Two months later? Regret hit harder than a Monday morning.
Step 5: Cancelling via Managed WordPress Hosts (e.g., Kinsta)
Managed WordPress platforms like Kinsta streamline the process, but with a few added warnings:
- Go to MyKinsta > Company Settings > My Plan > Cancel Plan
- Confirm that your site, DNS settings, and backups will be permanently deleted
- Enter your password and submit
Within 30 Days
Full refund minus any extra charges. The plan is canceled immediately.
After 30 Days
The plan stays active till the end of your billing period, and then quietly retires.
Kinsta also allows you to cancel or remove individual add-ons (like PHP upgrades, external backups, etc.) without touching the whole plan.
Step 6: Common Issues (And How to Dodge Them)
- “I can’t find the Cancel button!” → You might be logged into the wrong account.
- “There’s an error when I cancel.” → Payment method might be outdated. Update it and try again.
- “I lost access to my content.” → Wait for cancellation to process. If still unavailable, ping support.
Step 7: Before You Pull the Plug…
Take a deep breath and ask yourself:
- Have I backed up everything?
- Did I check the refund window?
- Do I want to migrate this site elsewhere later?
If you’re unsure, consider downgrading or pausing instead. Full cancellation should be your last resort, not your first panic move.
Final Thoughts
Learning how to cancel WordPress subscription might feel like you’re navigating a maze of settings, hosting panels, and backup tools. But with the right steps, it’s completely doable—and less frustrating than that time your plugin update broke the homepage.
Whether you’re freeing up budget, moving platforms, or simply changing direction, doing it right means less stress, no billing surprises, and peace of mind.
Need Help with WordPress or Looking to Migrate Smoothly?
We’re a leading Digital Marketing Company in Chandigarh helping clients manage WordPress the smart way—whether you’re scaling up or winding down. If you need expert advice, faster migration, or subscription management done right, we’re just a click away. No WordPress mess too big, no SEO goal too small.

